Showing posts with label Bohemian Dream. Show all posts

Sunday, 6 May 2018

CVS | Easter Beauties

Hello Scrappy Friends!
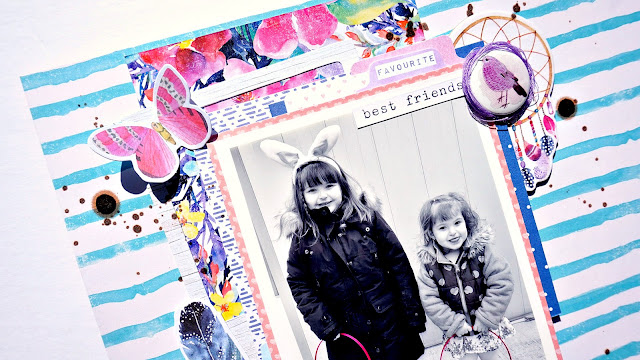
It's Lina here this morning sharing my layout using the gorgeously designed, Bohemian Dream. I documented a photo of my littles from this past Easter and this collection compliments the colours perfectly!


I began with my photo this time because I knew I wanted to use Bohemian Dream for this layout. I started on my phone using an app called Color Splash and made my image black and white and left my girl's Easter Baskets in colour. I wanted them to pop and not compete with the papers I was using. Instead, I wanted them to compliment each other.
Next I chose my background paper and that blue and white stripe, Wild Flower was screaming my name. Cutting a piece of the Abundant sheet of paper, I used it as a layering piece behind my photo.

Next, for the matting of my photo, I took pieces from the 6x6 paper pad as well as a couple scraps I had from the collection and layered behind my photo. I also used a photo frame from the Die Cut Ephemera to act as a layering piece. My photo is then popped up on foam for lift and dimension.


For my title, I used two different fonts from Thickers. One is Adorn and the scripty one in Rainboots. I just adore the look of a fun and playful title with multiple fonts.


Next, the fun stuff.... Embellishing! I lovingly sifted through pieces from the Die Cut Ephemera and the Accessory Stickers. I also chose a Chipboard Accent piece, Dream Catcher, to adorn the top right hand corner of my photo and floral layering piece. For some added drama and lift, I decided to add some foam behind a few of the flowers to ensure they jumped off the page and did not get "lost".
 
To complete my layout, I added some of the phrases from the Accessory Stickers sheet to convey some of my "journaling". I also added a Flair Button which sits within a nest of thread. Lastly, I added some splatters with some black ink spray.


And that's it!
I hope you enjoyed my layout! Have a wonderful day!

xoLina


Saturday, 20 January 2018

CVS | Morning Cuddles

Happy New Year Friends!
Today, on the blog featuring this layout I created on my little and her daddy cuddling. This little of mine is a big cuddler and just loves to snuggle, especially in the morning. I used the fabulous Bohemian Dream to document my photo and create my layout.


So, beginning this layout, I printed my photos in black and white. This was important to me as I wanted them to pop against the colours of the papers and embellishments and I didn't want them to "get lost" within my layout. This allowed me to have fun with the elements of the collection but still be able to speak volumes with my photos.


As I always do, I started by matting and backing my photos with pieces of patterned paper, most from the 6x6. I tell you, the paper pad is convenient and I don't have to feel bad about cutting into an entire sheet just to matte an photo. I then popped up my picture with dimensional foam for lift and to create shadow.

Next, I played with the ephemera a chose pieces I wanted to incorporate into my clusters. As I was searching through the paper goodness, I found the cut apart sheet with this wonderful quote on it. The sheet itself is called Boho Bits and I knew I HAD to use it. My husband and I always say our littlest little has a killer smile and she lights up a room with it. She makes people smile when she smiles. Needless to say, the quite was perfect!

For my title, I used alphas in two different fonts and colours. I always love using this technique as I feel it brings a little something extra to my work. A bit of whimsy, maybe.

The butterflies are one of my favourite element in this collection. I used them in this case to draw attention to the top of my layout for some balance since my layout itself is bottom heavy. They just bring everything together and make it more cohesive.

Lastly, I used (you guessed it :P) some gold ink spray to create some splatters. And, really, what's better than gold splatters? LOL!
Thank you all for stopping by today, I appreciate you! Enjoy your weekend!
xoLina

Saturday, 6 January 2018

CVS | Happy, Happy

Good Morning Scrappy Fam!
This morning I'm sharing a layout using the incredibly beautiful, Bohemian Dream. It's still my top fave and I don't think I'll ever bore of using it. All the pretty florals and gorgeous colours make this collection especially easy for me to use.
The photo I scrapbooked and am sharing on my layout was taken this past October for my oldest daughter's 4th birthday. Her party theme was Rapunzel and so the purples in this collection worked perfectly with the costume my girl is wearing. So, here's what I did...


I started by choosing that gorgeous white washed, woodgrain paper. It's called Kaleidoscope and it's probably one of my faves from the entire paper set. With my Silhouette Cameo, I cut the word happy with one of the fonts on my computer and then paper pieced the word with the purple ombre, watercolour piece. This will work as part of my title.
Then I backed and matted my photos with papers from the 6x6 paper pad. I'm loving this new addition to the CVS lines. It makes paper piecing and matting photos a breeze. I then layered some foam sheet behind my photo for lift and dimension.

 Working on my title, I chose the word Happy from the Chipboard Accents sheet. Along with the die cut word, my title reads, Happy, Happy. Fitting as my girl is smiling from ear to ear in this picture. 😀


 Happily sifting through all the amazingness that is the Die Cut Ephemera and Vellum Accents, I decided I wanted to use florals as my embellishments. I created a few clusters and arranged my flowers how I liked them.
I then took some metallic gold thread and made a nest for my Flair button to rest within. The button I chose reads, "You are Amazing". I just love this look!

I felt the bottom right corner needed some anchoring and grounding so I took this opportunity to add a smaller cluster embellishment with a floral, label, and a tiny word sticker.

I gave my layout a good sprinkling of love with the tiny words from the Accessory Stickers sheet. They are my favourite way to "journal" or convey a message without adding my own handwriting to the layout. I'm hardly ever a fan of my writing once it's down on a layout.


Lastly, for some added sparkle and shine, I added some gold ink spray in gold. I've been doing this a lot lately and I have fallen in love (AGAIN) with the look of sprinkled paint splatters.


Thank you so much for joining me today on the blog. We'll see you all again soon!
xoLina


Wednesday, 6 December 2017

CVS | Good Tidings

Good Morning Friends!
Lina here with you this morning to share I layout I created for this week's theme over on the Cocoa Vanilla Studio Blog of creating a Christmas layout using non-Christmas items. I loved this week's challenge, it forced me to think outside the box. Sometimes I get stuck in a rut but having something like a theme or a sketch to work with totally brings the creativity out in me.

Here's my take...


What a better way than to push my creativity than to use the gorgeous Bohemian Dream collection for a Christmas layout? Haha! It's full of beautiful florals and I thought to myself, "Why not?"
I decided to start this layout with a cut file, so I Googled "geometric Christmas Tree and found one I liked. I then used the Silhouette Design Studio to trace and then my Silhouette to cut it all out. I cut it out twice, once for the background and a second time so I chose a different patterned paper for the outline. I then flipped the original navy, polkadot called Abundant over and used the beautiful floral design in the back to fill in my pieces in the tree. I believe from start to finish, this process took about 15 minutes or so. I just love the effect and feel it's totally worth the extra effort.


I then continued to matte my photo. For this, I used pieces from previously cut into sheets as well as some papers from the 6x6 paper pad. I also used a bit from the cut apart sheet. Love this method!


For the title work, I chose the word "good" from the Chipboard Titles sheet. I knew I wanted my title to be white so I just left them as they were. Then, I went through my stash and picked out some white Thickers in Daiquiri and finished my title, reading "Good Tidings". I think it worked out pretty well. Totally complimented the theme and super simple!


Continuing forward, I worked on my embellishing. I chose pieces from both the Die Cut Ephemera and the Vellum Accents packages. I created my clusters using these as foundation pieces. Creating one cluster in the bottom right and a smaller on in the top left of the photo. I also added embellishments from the Chipboard Accents such as the hearts.


Next, I wanted to use a button from the Flair Buttons and so I chose the minty one that reads, "One of a kind." I created a nest of sorts using metallic gold thread that I wound around my index and pointer fingers and placing on my layout. I put some glue in the middle and then added my flair directly on top. It creates a nice little place for the flair button to sit.
To decorate my tree, I used the Enamel Shapes... an entire package. LOL! How very liberating to use and entire pack of something. Anyhow, I used them to dress up my tree and act as a sort of baubles. So cute!


Lastly, I used some HSCS in Gold to add some gold splatters around my page, mainly focusing around my clusters. Done!

I hope you enjoyed my layout today as much as I enjoyed creating it! Have a wonderful rest of your day!
xoLina ❤️


Monday, 20 November 2017

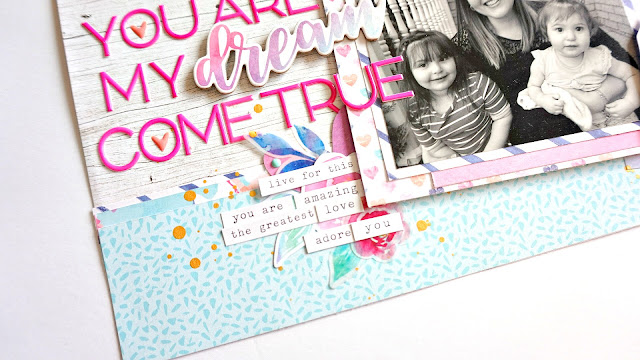
CVS | You Are My Dream Come True

Good Morning Fam,
Hope you all are having a lovely day thus far! Sharing my latest creation with you for Cocoa Vanilla Studio. Our theme this week was Gratitude. And, like most parents, I am grateful for my little meatballs. They have made me the happiest of people and saved me so many times. I will be forever grateful for their existences ☺️


This is what I created using the newest line, Bohemian Dream...


I know I mention this alllll the time, but I am completely and utterly smitten with this collection. It's just beautiful!
I began with the back ground sheet which is called Kaleidoscope. It's that gorgeous, whitewashed woodgrain you see. Next, I took about a 2.5 inch cut from the light blue sheet and a sliver from the dark purply blue horizontal stripe, and created my base. The entire layout is bottom heavy and I love how the papers act as an anchor for my photo, title and embellishments.

Next, I always work on my photo. I chose a few papers from the 6x6 paper pad and one full sized sheet and matted my photo. Then I popped it up on foam for dimension. I love the over look of this technique; It really allows the photo to jump off the page. In this case, the photo is printed in black and white. I printed it in both colour and Black and white but I liked how the black and white photo looked best against the colours of the collection. 


For my title, I worked with the "dream" piece from the Chipboard Stickers and worked around it using Thickers in Hardcover, a hot pink puffy sticker type. The colour really works well with all the pinks in the collection. I'm happy with how the title worked out. 

Now for my favourite part... embellishing. I used pieces from the Die Cut Ephemera package as well as florals from the Vellum Accents. I really had to stop myself from using "all the things" 😛 I created clusters in the top right of the photo and the bottom left; Layering both ephemera and vellum.

When it came to embellishing, I wanted to incorporate something to signify me and my littles. I used 3 vellum butterflies from the collection, one larger a medium and a small. I only glued the middles down and then folded up the wings to simulate the butterflies in flight. I think this is my most favourite element on the entire layout. It makes my heart happy. ❤️
I then added a few choice tiny words from the Accessory Stickers sheet. You friends already know how I feel about these. LOL! I'm in total love with them!

I also added some gold metallic thread in nest formation and rested a Flair Button on top, using the beautiful pink butterfly flair.


To finish off my layout, I added some HSCS in Gold and some Enamel Shapes. They're both the most awesome finishing touches!
 
I hope you've enjoyed what I've shared today as much as I've loved creating it! Thank you so much for joining me today on the blog!

xoLina

Monday, 6 November 2017

CVS | Life is Good

Good Morning Scrappy Fam!
Sharing my layout I created using the Bohemian Dream collection from Cocoa Vanilla Studio. I have two little girls and so this collection is absolute perfection. The photo I have scrapbooked is of both my little monkeys, oddly enough, sitting on a tree stump in the forest. 😛

I started this layout knowing I was going to use a cut file. The one I chose is from Paper Issues and you can find it on their website. However, I only cut half of the file, I didn't want to use the entire file and fill my page. Instead, I opted to cut half and showcase the beautiful papers.
The file is cut from the paper Dreamer which was then backed with the Kaleidoscope paper. Then both were adhered to this gorgeous coral heart paper named, BoHo Bits. Just love the colourful over all look.


I printed my photo in black and white so that it would stand out again all the beautiful colour of the papers. I matted my photo with pieces of scrap paper from previous layouts and a couple from the 6x6 paper pad. The 6x6 paper pad is just perfect for matting your photos, cards and filing and backing cut files. It's my new fave!
I added some cut leaves from the Color Me Happy cut file set to the bottom left and right sides of my photo. This created my foundation for layering my ephemera.
For my title, I chose to use the fittingly perfect, Life is Good from the Chipboard Titles set. I left them white because I loved the contrast. 


I used pieces from the Die Cut Ephemera pack and that cute purple bird from the Chipboard Stickers for my clusters. I also tucked in a partially cut chipboard frame behind my photo for added depth and dimension. To add to my clusters, I also used pieces from the Vellum Accents and Accessory Stickers. I just am loving all the florals in this collection! 


I felt the right side of my layout was missing something and so I decided to anchor the entire thing with a thin piece of paper cut from the Kaleidoscope sheet running vertically. I also added a smaller cluster using some tiny words from the Accessory Stickers, a chipboard piece and some metallic silver thread. 


To add a bit of something else, I took some white ink spray and splattered some paint around my clusters. It's subtle but I like the effect. Finally, I finished off my layout with a healthy sprinkling of peach Enamel Shapes in and around my page. It just adds a bit of something else without going over the top.
I also used a Flair button up in the top left hand corner which is sitting in a nest of strategically placed metallic thread in silver.

I just adore the way this layout came together and I hope you do as well! ☺️ 


Thank you so much for joining me today on the blog. I appreciate all your love and support!
xoLina

Friday, 20 October 2017

CVS | Big, Beautiful You

Good Morning Friends!
Lina here today and I'm sharing my very first layout using the incredible Bohemian Dream collection. I must first preface this post with saying that I am absolutely smitten by this collection. Zoe has knocked it outta the park for me with all the tones of purple and florals. Perfect!

The layout I'm sharing is of my littlest meatball at about 9-10 months. She was wearing purple and it matched perfectly with the collection so I went with it.
We were challenged this week to use new product... Done and done! Everything I used is new to me and newly available in the CVS shop. Here's what I created:


I began my layout with a crisp sheet of white card stock and a piece of the gorgeous dark purple diagonal stripe paper called, Dreamer. I mounted it to the top of my white card stock and got to work. I chose papers from the new 6x6 paper pad and started matting my photo which roughly measures 4x4 inches.
Next, I worked on my title because it would need to dry before I could use it. I took the words Beautiful and You from the Chipboard Titles and sprayed them with some ink spray. I chose a dark aqua, vibrant pink and a purple. I sprayed the word pieces and used my heat gun to speed up the drying process. I then set them aside and began working on my embellishments.For the BIG part of my title, I used the word title from the Chipboard Sticker Set. I love the mix of fonts!


I lovingly sifted through the Die Cut Ephemera, admiring every detail and piece and chose some of my favourite that would correspond well with my layout. I also used some of the Vellum Accents for layering. I love the subtle look of them. Using some metallic silver thread, I created a nest of sorts for the Flair Buttons to sit within. I used two Flair on this layout.


Next, taking the tiny word stickers from the Sticker Accent Sheet, I added my favourite sentiments in and around my page. I did this with other stickers around my page as well.


Finally, as a finishing touch, I added some of the Enamel Shapes in the Aqua and the Pink. They are a perfect addition to any layout. They just complete the layout in my opinion. 


Thank you so very much for taking the time to share in my layout. I appreciate all your kindness and love! ❤️ Have a wonderful day!
xoLina